Skin
The Skin folder on the lookdev controller fine-tunes how your character's skin reads. The tool already builds physically-based skin with subsurface scattering, normal detail, and proper roughness — these controls push it toward your taste or your shot's lighting.
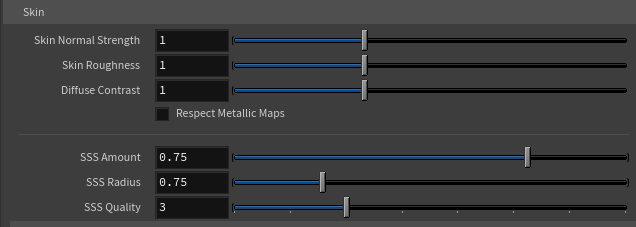
Skin Normal Strength
Controls the intensity of the skin's normal map — the pore-level surface detail and fine wrinkles baked into the texture. Defaults to 1 (as authored). Lower values smooth the skin out; higher values exaggerate the surface detail.
Raise it if a character's skin looks too smooth, lower it if it looks noisy or harsh under your lighting.
Skin Roughness
A multiplier on the skin's roughness.
- Below 1 makes skin glossier and more reflective — often more lifelike, since real skin has a subtle sheen, especially on the forehead, nose, and cheekbones.
- Above 1 makes skin more matte and dry.
Small adjustments go a long way. Try 0.9 or 1.1 before reaching for extremes.
Diffuse Contrast
Adjusts the contrast of the skin color texture around mid-grey.
- Above 1 makes freckles, blemishes, and color variation read more strongly — more character and detail.
- Below 1 flattens and evens out the skin tone.
This control is very sensitive. The useful range is roughly 1.0 to 1.1 — even small moves have a strong effect. Nudge it gently.
Skin Re-tint sub-folder
A quick way to shift the overall skin tone — warmer or cooler, more tan, paler — without going back to Character Creator. It tints the skin diffuse toward a color (the subsurface color is left alone), live, across all skin materials: head, body, arms, legs, and nails.
- Skin Re-tint Color — the color the skin is tinted toward. The skin diffuse is multiplied by this. White (the default) does nothing.
- Skin Re-tint Amount — how strongly the tint is applied. 0 (default) leaves the skin untouched; 1 fully multiplies the skin by the re-tint color. The slider caps at 3 but accepts higher typed values — above 1 overdrives the tint for a stronger push.
- Skip Nails — exclude the fingernail/toenail material from the re-tint, so the nails keep their original color while the rest tints. Off by default.
Respect Metallic Maps
Off by default. Character Creator sometimes exports metallic maps on teeth and inner-mouth materials that aren't meant to be truly metallic, which can make those areas look wrong. The tool ignores them by default for a correct look.
Turn this on only for a stylized character with genuinely metallic inner-mouth materials (rare).
Teeth sub-folder
Character Creator exports teeth close to white and quite glossy, which can blow out under Karma's lighting. This sub-folder (below Skin Re-tint, above Subsurface) tames the teeth and tongue without re-exporting.
- Teeth Brightness — overall brightness of the teeth/tongue diffuse. 1 is as exported; pull it below 1 for more natural, slightly darker teeth. Affects the diffuse only.
- Teeth Roughness — a multiplier on teeth/tongue roughness. Teeth are wet, so a sharp specular highlight can clip to white; raise above 1 to spread and soften that highlight — the main fix for glary, blown-out teeth — or lower for a wetter, glossier look. 1 is as authored.
- Teeth Specular — strength of the wet specular reflection. 1 is full; lower it to reduce the glossy catchlight that can read as blown-out white on close-ups.
- Teeth SSS Amount — subsurface scattering on teeth and tongue only, separate from the skin's SSS Amount. The warm scatter lifts the teeth's midtones and adds to the over-bright look; lower it to make teeth read more solid/opaque. 1 is the default. Disabled when Remove SSS is on.
Subsurface sub-folder
The subsurface controls — SSS Color, SSS Amount, SSS Radius, and SSS Quality — live together in a Subsurface sub-folder inside Skin. All are disabled when Remove SSS is on (including the Preview preset).
SSS Color
The color light picks up as it scatters through the skin — the warm, fleshy glow you see where light passes through thin areas (ears, nostrils, the edge of the nose). Defaults to a warm skin tone (255, 200, 170). Push it cooler (bluer/greener) or warmer (more orange/red) to shift the character of the scatter. Applies to both skin and teeth. Most characters look right on the default; reach for it only if the scatter reads too warm or too pink under your lighting.
SSS Amount
How much subsurface scattering the skin (and teeth) receive. Subsurface scattering gives skin its soft, lifelike translucency, but at full strength it can wash out fine surface detail.
- 1 (default) — full lifelike scatter, softest and most translucent.
- Lower values — recover fine surface detail, at the cost of a slightly waxier look.
- 0 — effectively no scatter.
SSS Radius
How deep light scatters through the skin. The detail-recovery companion to SSS Amount:
- Higher — softer, more translucent, but washes out fine detail.
- Lower — keeps more surface detail but looks firmer.
Use it together with SSS Amount to dial in the balance between lifelike scatter and skin detail. Default 0.75.
SSS Quality
Controls the subsurface scattering ray limit on skin and teeth. Higher values give cleaner, less noisy subsurface at the cost of render time. The default (3) is a good balance; raise it for final hero renders if you see noise in the soft, light-penetrating areas — ears, nostrils, lips.
SSS Quality needs a render restart
This is a Karma render property, which Karma reads only when a render begins. Restart your Karma render to see a change take effect.